Mastering ISR in Next.js: How to Boost SEO and User Experience
October 10, 2024
10 Min Read

ISR is a hybrid rendering method in Next.js, which is useful for SEO and improving user experience. In this article, I will explain how ISR works in Next.js, show examples of implementing ISR in both the Page Router and the App Router, and finally, address some common questions about ISR in Next.js.
What is ISR?
ISR is a hybrid rendering method in Next.js. It regenerates static pages at specific intervals, which helps with SEO and improves the user experience by keeping content up to date without rebuilding the entire site.
How Does ISR Improve SEO and User Experience?
If you’ve used React.js or a traditional Single Page Application (SPA), you know that there is typically only one HTML file in an SPA. When a user first visits an SPA website, the SPA sends a minimal HTML file (in React, this is usually index.html). After that, it fetches CSS, JavaScript, and other resources needed for the requested page. These resources are then rendered and combined into the HTML once they reach the client (the browser). However, as mentioned earlier, the initial HTML file sent by an SPA contains little to no content.
Now, imagine a Google bot requesting the website instead of a user. While modern Google bots can execute JavaScript to retrieve content, relying solely on this can still negatively impact SEO. The bot might see the initial HTML as empty, which could delay indexing the page content, potentially harming your search rankings.
Next.js solves this by using pre-rendering techniques, such as generating static pages. We will talk about rendering in detail later, but here’s a brief overview. With pre-rendering, the HTML for each route is generated on the server and sent directly to the client. The CSS and JavaScript files are typically bundled and cached.
So, when a user or Google bot visits the site, they immediately see a fully rendered page. This improves SEO because the Google bot can instantly see the content in the HTML. It also enhances the user experience by speeding up page loads, meaning users don’t have to wait for the content to load dynamically.
How Does ISR Work?
If you want to understand better how ISR (Incremental Static Regeneration) works, let me explain with an example. Imagine you're an admin who manages a list of blogs on your website. You don't want to rebuild your project every time you post a new blog. Instead, you want your blog list page to update automatically, say, every 60 seconds. So, when you write a new blog, you want it to show up without manually rebuilding your project. This is where ISR comes in. While you could use methods like SSR (Server-Side Rendering), if you want your website to update at specific intervals, ISR is the way to go. We'll talk about SSR later.
Now, let’s say you implement ISR on your blogList page and set the revalidation time to 60 seconds. You build your project for the first time, and the revalidation timer starts. A user visits your website, goes to the blog list page, and sees the current list of blogs. Meanwhile, you publish a new blog post, but because there are still 20 seconds left in the 60-second window, new users visiting the site won’t see the new blog yet.
Once the 60 seconds are up, ISR checks for new data, sees that there’s a new blog post, and regenerates the static page with the updated content. It then caches the new version on the server. Here’s something important to note: while ISR is regenerating the page, users still see the old version until the new one is ready. So, after ISR finishes, any new visitors will see the updated page, but users who were already on the site before the revalidation will still see the old page unless they refresh it.
Another key thing to remember is that when you build your website using npm run build, the initial static page is generated by SSG (Static Site Generation), not ISR. After the first build, ISR kicks in to handle the regeneration process. Also, ISR doesn’t regenerate your entire site; it only regenerates the specific page where ISR is implemented. So, when ISR regenerates, only that specific page is updated, not the whole project.
How to Implement ISR in the App Router
To implement ISR (Incremental Static Regeneration) in the App Router, it's important to know that ISR must be used in server components, not client components. This is because ISR is a server-rendering method, not a client-side one. So, you should place ISR in files like app/blog/page.tsx or app/blog/page.jsx.
One key point to remember is that if you don't call your API in the server component where the revalidate option is set, ISR won't work. The server component must be able to fetch new data in order to regenerate the page, otherwise, no updates will occur.
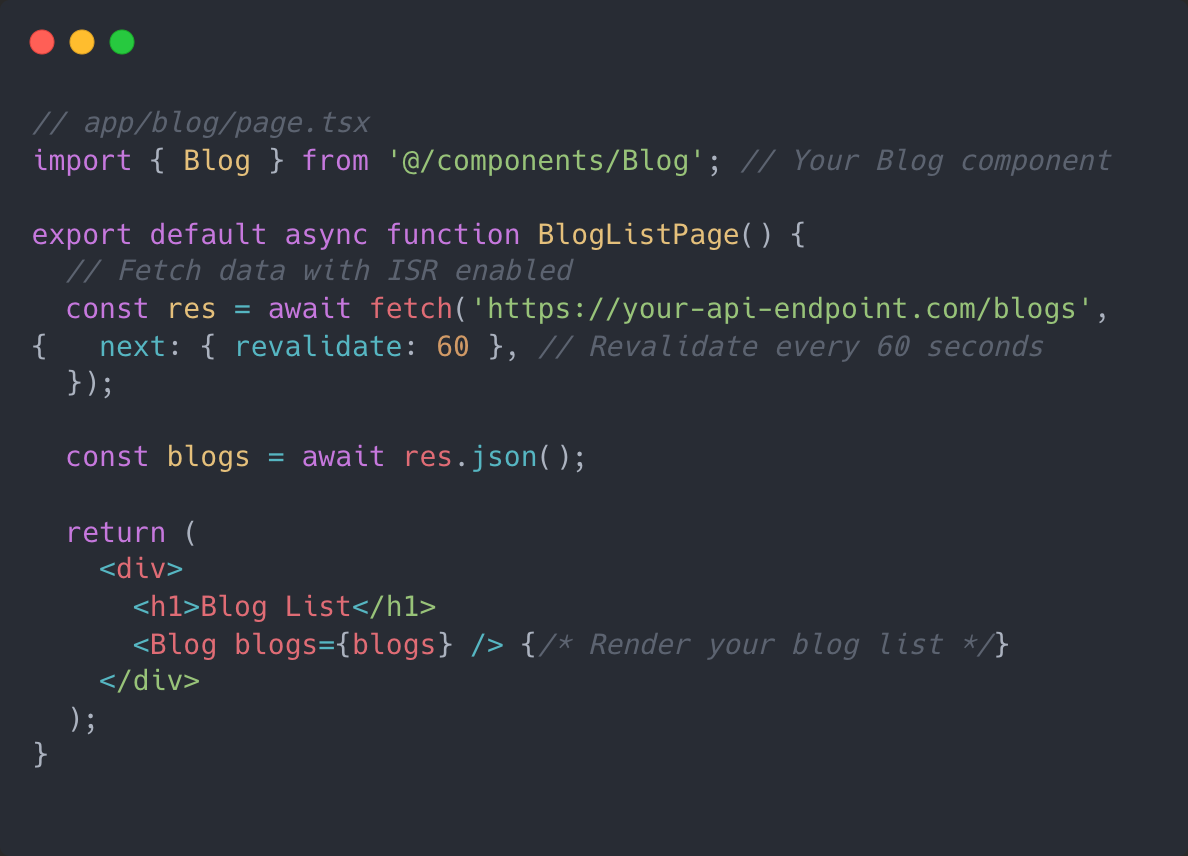
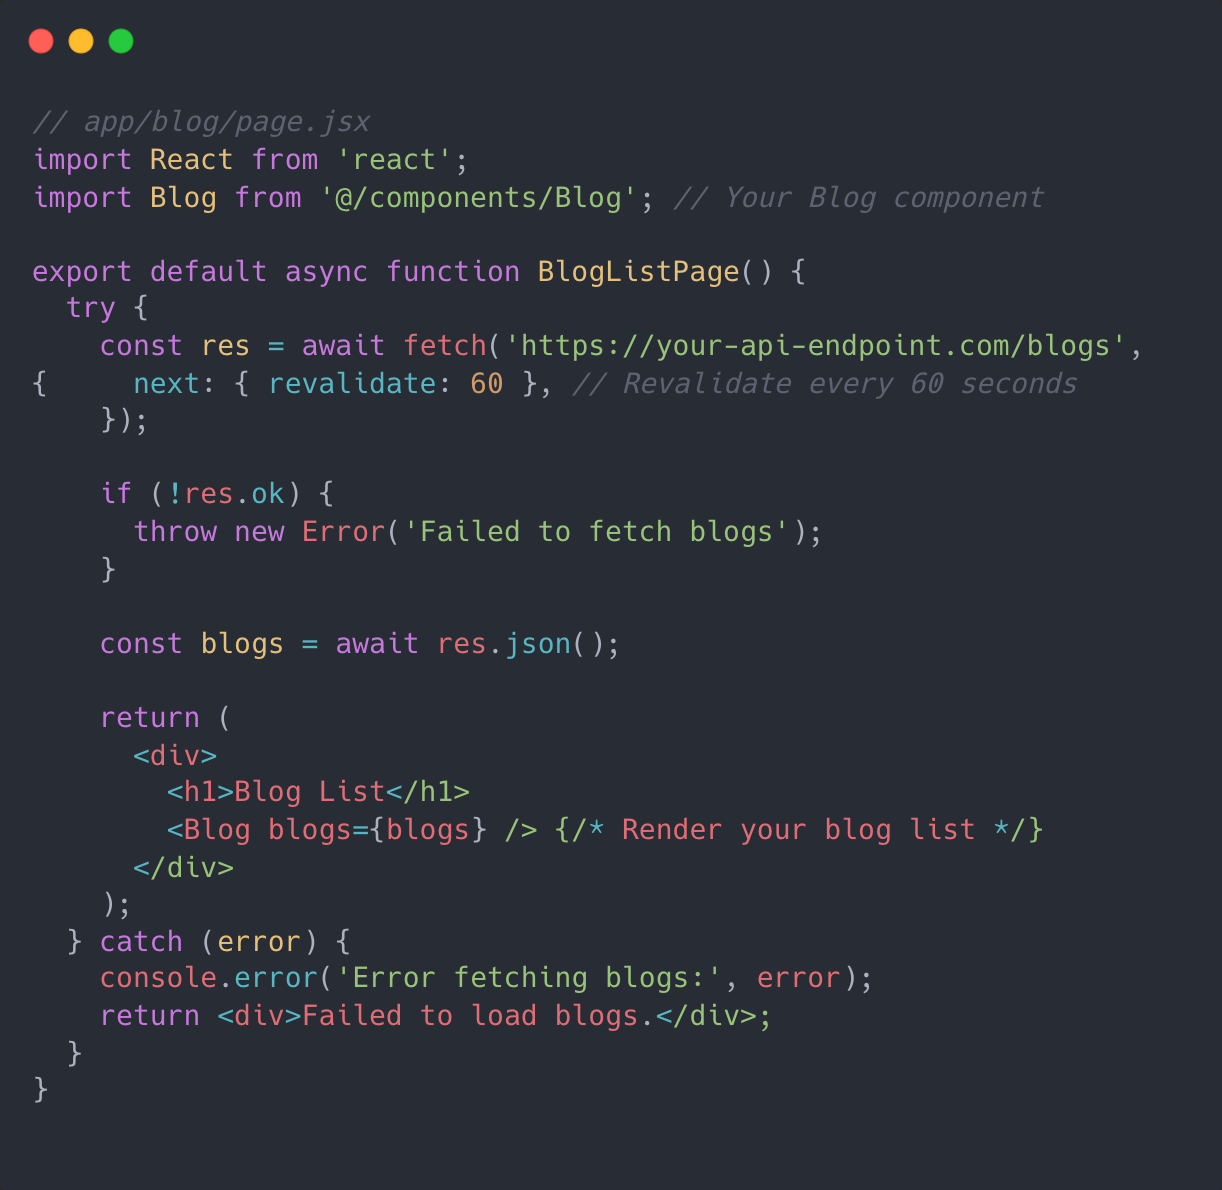
To enable ISR, all you need to do is add the revalidate property to the fetch method. If you prefer using Axios instead of fetch, you can still use it by configuring the request similarly, but for now, I'll stick to using fetch. Maybe later I'll explain how to do it with Axios.
i provided example with tsx file and jsx fiel :
this is example of implementing in tsx file

this is example of implementing in jsx file :

How to Implement ISR in the Page Router?
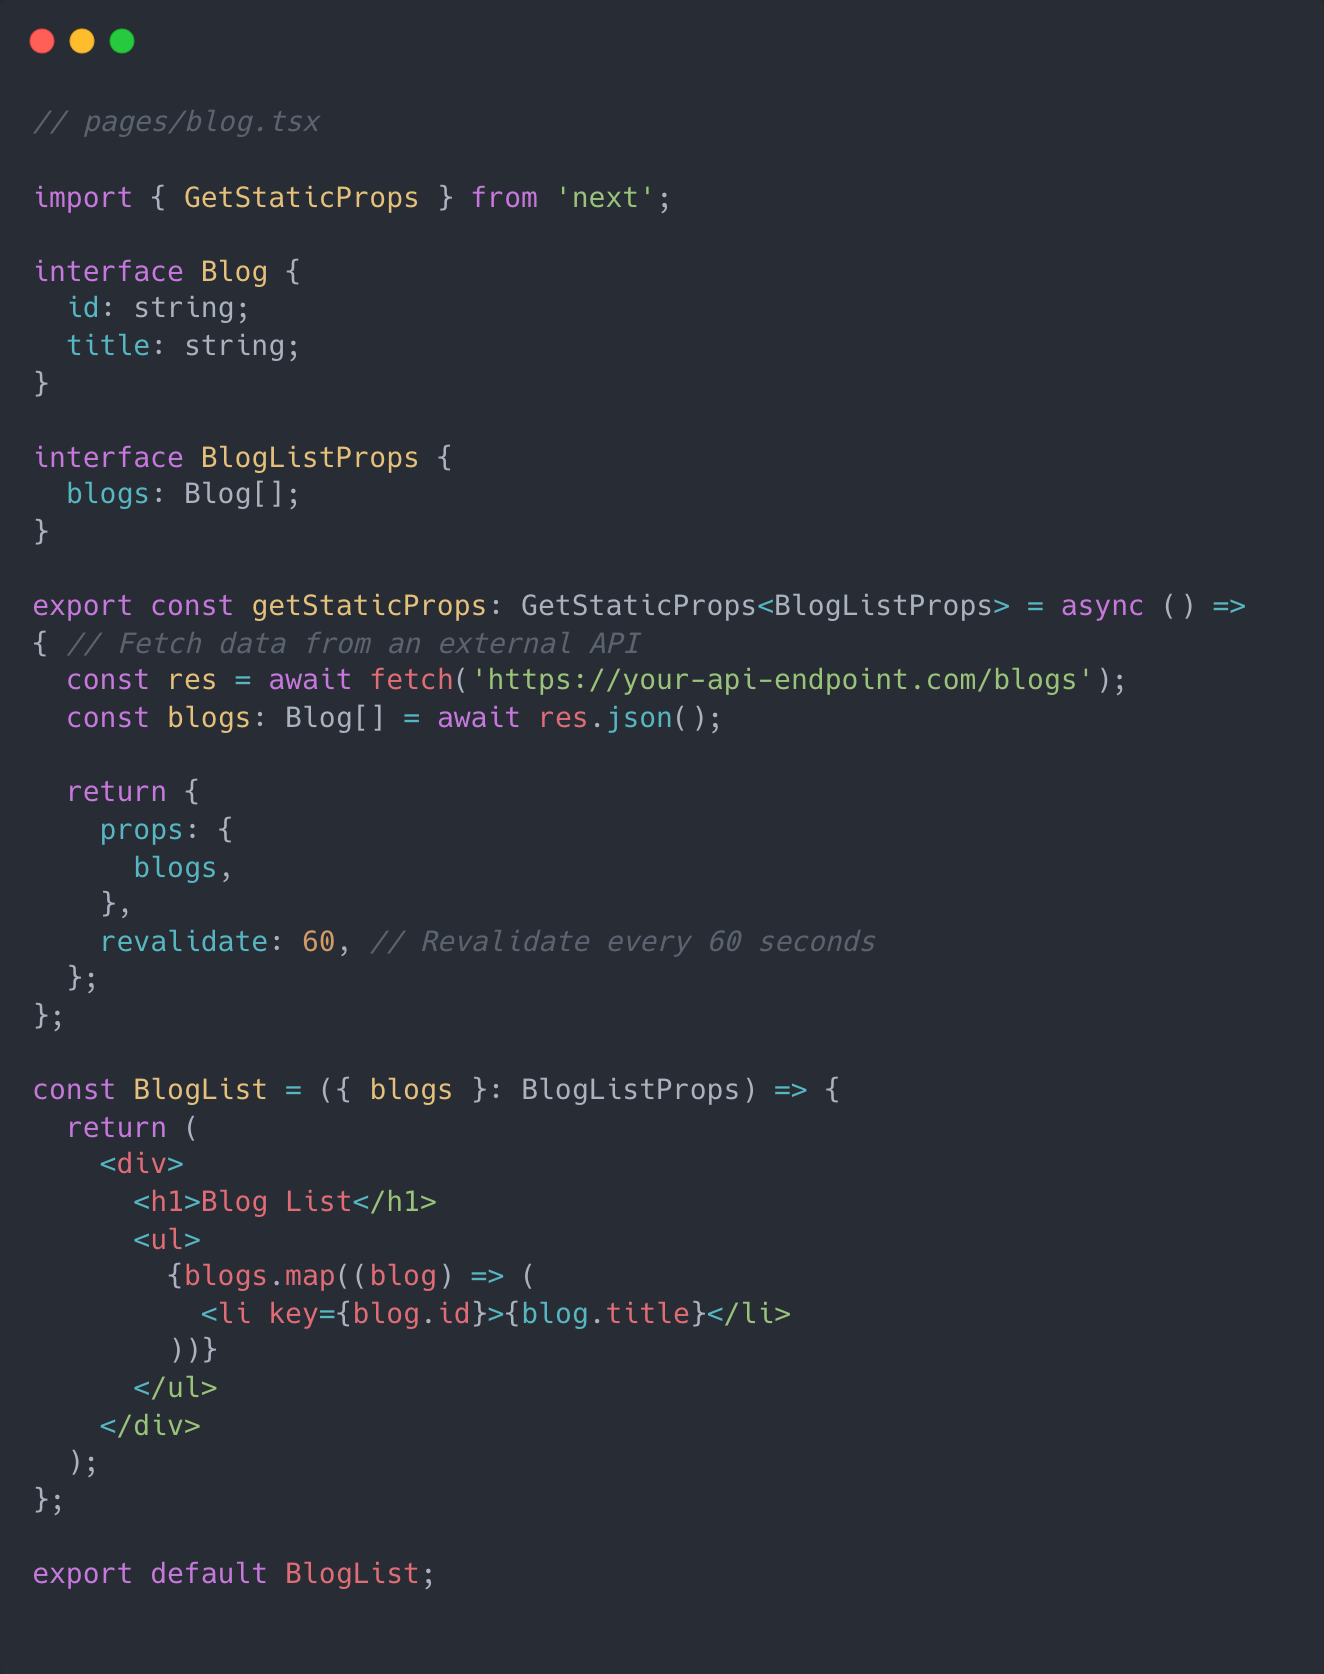
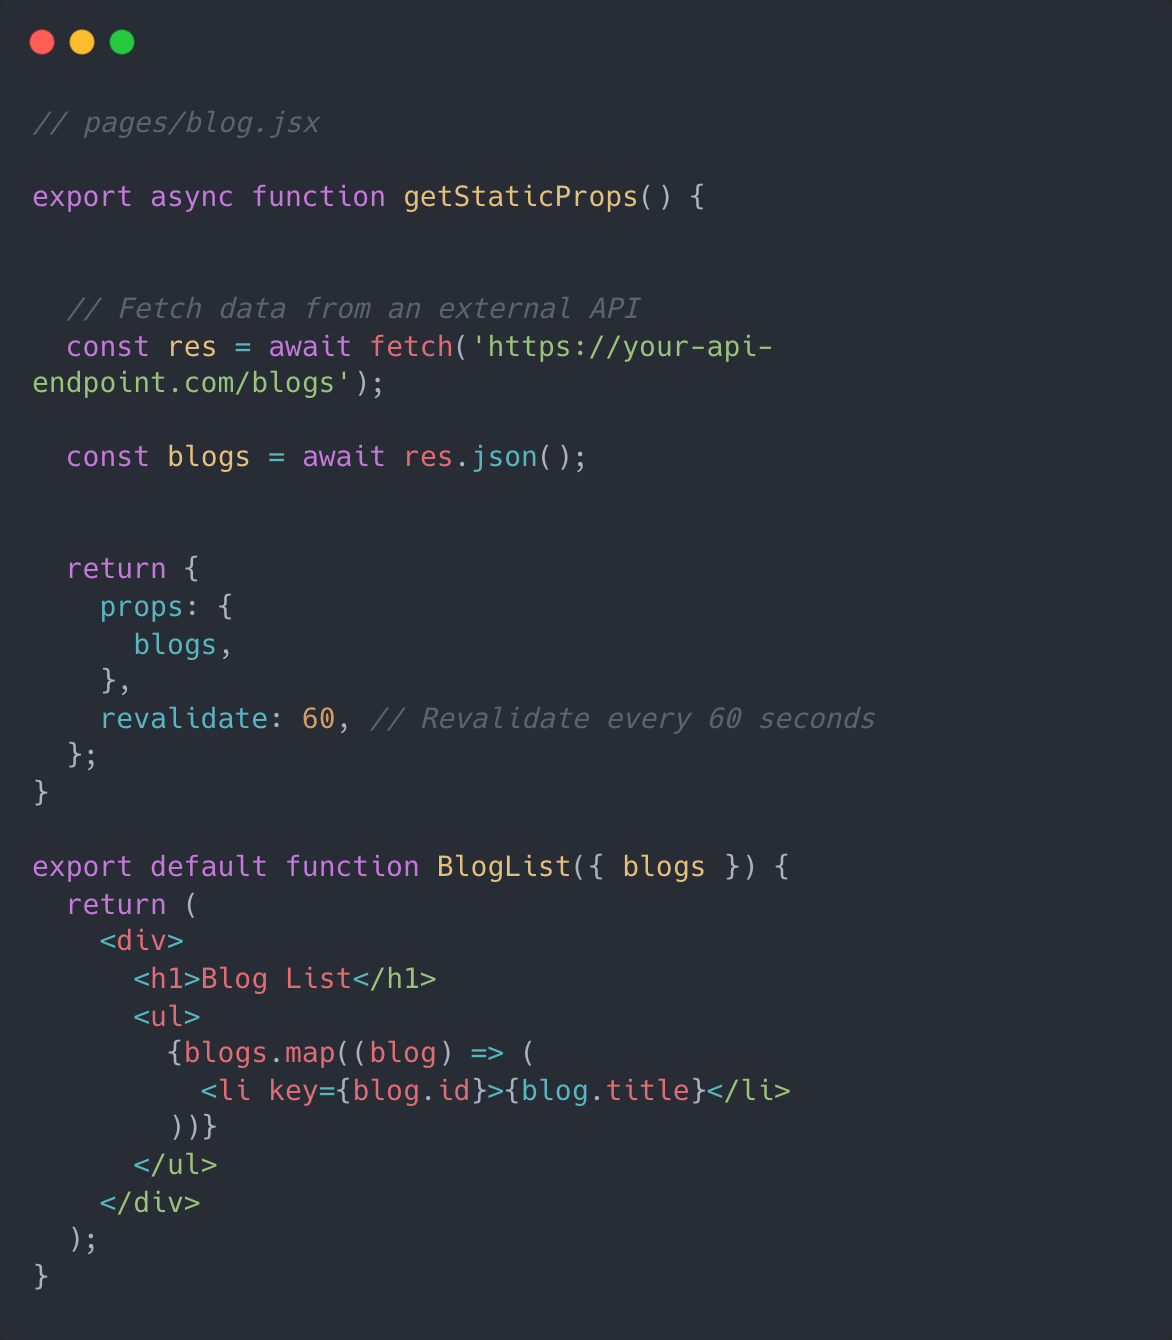
To implement ISR in the Page Router, you must export getStaticProps from your component and add the revalidate property to this function. This function only runs on the server, so you need to make sure to call your API inside getStaticProps. As mentioned in the previous section, you can use fetch or axios to fetch your data, but keep in mind that the API call must be made inside getStaticProps, or else ISR will not work.
Again, this function is executed on the server, not the client. Here’s an example to demonstrate:
this is example of implementing in tsx file :

this is example of implementing in jsx file :

Conclusion
ISR in Next.js runs after the initial build and improves both SEO and user experience. You can create your component using other methods like SSR or SSG, but sometimes ISR is needed for specific use cases.
You need to have a good understanding of what ISR is, how it works, and how to implement it in both the Page Router and App Router. In this article, I’ve tried to explain it as clearly as possible, and I will update it later if I can explain it even better. If anything is unclear, please let me know by leaving a comment, and I’ll provide further clarification.
Thank you for reading this blog, and I hope you enjoyed it!